
All Activity
- Past hour
-
 KinkySlayer#1567 joined the community
 - Today
-
 daden90 joined the community
 -
 lousanda joined the community
 -
 YWP4UL0TTV#1902 joined the community
 -
 edimarco12 joined the community
 -
 BulletBytes#1948 joined the community
 -
 Demonarch#2833 joined the community
 -
 SupremeHorse#2845 joined the community
 -
 Calgan#2665 joined the community
 -
 pacheco693 joined the community
 - Last week
-
 We are starting something new, something we are really excited for. Our team will begin to create different mini games for our Crimson Loot Carnival. Games will run every single hour, starting from Saturday 4PM CST and go on for approximately 6 hours EVERY SINGLE SATURDAY. Every game will have one winner which takes home a cash prize, we've given away over $4000 USD so far on the LilithMommy stream and now this stream will become "Crimson Loot Carnival" as a total re-branding of what we are trying to accomplish, a new live experience which digitalize's the carnivals of the 19th century. We will also bring on board different Pro Gamers to hear about their journey, starting with everyones favourite, Raxxanterax 🙂, We will delve deep into what makes Raxx who he is and then we will play The Hat Game, where everyone will choose a hat to go under before Raxx chooses which hat to blow up 🙂 The last little devil standing will win the prize! Here is an example of The Hat Game Then we will do an offer where you can double your prize through a Tarot Card Reading FLIP! Here's an example of that. We will continue to work on making new interesting games for the Carnival to grow into something that can provide a really special experience for you. I hope to see you there! Region Timezone Local Time USA (CST) CST 4:00 PM (Saturday) Europe (e.g., Germany, France, Italy) CEST (Central European Summer Time) 11:00 PM (Saturday) Australia (e.g., Sydney, Melbourne) AEST (Australian Eastern Standard Time) 7:00 AM (Sunday)
 -
We thought, well, we knew it would be a good idea to give people updates about what is going on in the club since people might be wondering about the progress of the current build, their own reward deliveries, what the next builds might be and overall how the club is going. This is the beginning of that. Let's start with the current build, The Last Epoch PC. This is an extremely difficult build with a very intricate water cooling system and a details case mod which we had to 3D model, print, assemble, sand, prime, paint 3 coats on and mount. WORK IN PROGRESS PHOTOS - nothing is final here EHG told us that they would help us show the PC off, unfortunately we think that if we were to send it to someone next weekend, it would be in the spotlight for too short of a time for the amount of effort time and money put into it. Therefore we have decided to move this build to next month, I hope the concepts we showed before being realised here in these new images is enough for you to not get too upset with us for this decision. WORK IN PROGRESS PHOTOS - nothing is final here (we have more polishing etc to do) We do have a saving grace, a friend of ours who goes by the name Waffles has been building computers full time as a life style and profession, we have decided that he will join us in building custom PC's, he is undertaking the Kintsugi build which is an amazing computer but we got stuck with that one too because the waterblocks for 5080s are not available, ours was supposed to arrive before the 10th of April and then we got an email saying it will come at the end of May. So Waffles did some quick thinking and told us everyone loves his sleeper builds, so we went ahead and started to concept out a sleeper build. We got all of the parts and he went to work, he provided the necessary videos (it isn't easy especially for the first time to get good footage, he made a build log which you can read, we edited all of the videos and posted them). This computer is done and this is the one we want to send out next weekend. Now for some people we are still working through getting their reward to their door, we always do achieve it, we delivered a computer to China (not easy, had to go there personally on a plane) and we delivered a computer to South Africa (insane if you think about it), a computer with a real diamond in it too. That one came with a broken ram card (We tested everything before shipping it so the plane turbulence may have caused damage), we have literally replaced every single damaged component if there is one in a PC going as far as replacing an entire GPU for the first clock we sent (damaged in flight). Based on these experiences, we have learned to take great care when shipping to certain countries, we get custom crates made, go very heavy on packing, get premium delivery services (we had computers stuck in random warehouses etc otherwise), this is time consuming and costs a lot of money so please bare with us if you have a large reward which we need to ship to you, some of the custom computers we build are THIRTY KILOGRAMS and have intricate designs so we want to make sure it gets to people in one piece. We will get better and faster at shipping worldwide as we go but so far we have delivered every computer thus far and replaced any damaged parts (only happens about 10% of the time). Now let's get on to what we have planned next, We have been working on a project revolving around the first ever Macintosh, we are trying to fit it out with the best modern parts it can fit, we've already cleaned up the case to remove stains and yellowing. The biggest challenge we have put forward to ourselves is to make the Screen of the Macintosh hook up the the modern GPU, that means we will be seeing modern games in low pixel count black and white on the screen. This is going to be insane if it works the way we think it will, it's going to be a real gem and of course you can hook up additional monitors to play games properly, it's just for show but we want the screen to work properly. You can check out how this is done here We'll of course have the full build video etc soon, we already filmed taking the Mac apart which was very interesting to us as we were dealing with some of the first harddrives in personal computing, these things had 20 megabytes of disk space xD. We will try to give weekly updates now here 🙂
-
De-Yellowing and Restoring Classic Macintosh Computers: A DIY Guide
Merzal#1414 posted a blog entry in Computers's Articles
What You’ll Need Hydrogen peroxide (6–12%) – liquid form, not cream Large plastic bin – big enough to fully submerge the Mac’s shell parts Clean water (if diluting concentrated peroxide) Clear lid or cling film – to trap heat and intensify UV Sunlight or a UV lamp Gloves and eye protection Optional: a bit of OxiClean (activator, makes it fizz a bit) Step-by-Step: Retrobrighting by Soaking 1. Disassemble the Mac Fully remove all electronics—only the plastic should be submerged. Be gentle with clips and tabs; they get brittle with age. 2. Clean the Plastics First Wash with dish soap and warm water. Scrub off dirt so the peroxide can work on the actual surface. 3. Prepare the Peroxide Bath Fill your bin with enough hydrogen peroxide to cover all parts. If using a high-concentration peroxide (like 35%), dilute it with water to ~10–12%. Add a small scoop of OxiClean (optional, helps activate the peroxide with oxygen bubbles). 4. Submerge and Seal Place the plastic parts in the bath, making sure they’re fully submerged. Use plastic mesh, rocks, or zip ties to keep them from floating. Cover the bin with clear plastic wrap or a transparent lid. 5. Expose to UV Place the entire bin in direct sunlight for 6–12 hours (or longer if yellowing is deep). Sunlight warms the bath and activates the peroxide. Stir gently or rotate parts occasionally if possible. 6. Rinse and Dry Remove parts, rinse thoroughly with water, and inspect the results. Dry completely before reassembly. 7. Repeat if Necessary Some yellowing might need a second round, especially if it’s deep or uneven. Notes and Warnings ALWAYS wear gloves and goggles when working with peroxide—especially in large amounts. Don’t use metal tools in the bath—it reacts with peroxide. Don’t leave in sun too long, or the plastic can warp if the bin gets too hot. Do this outdoors or in a well-ventilated area—oxygen off-gassing can build up pressure. -
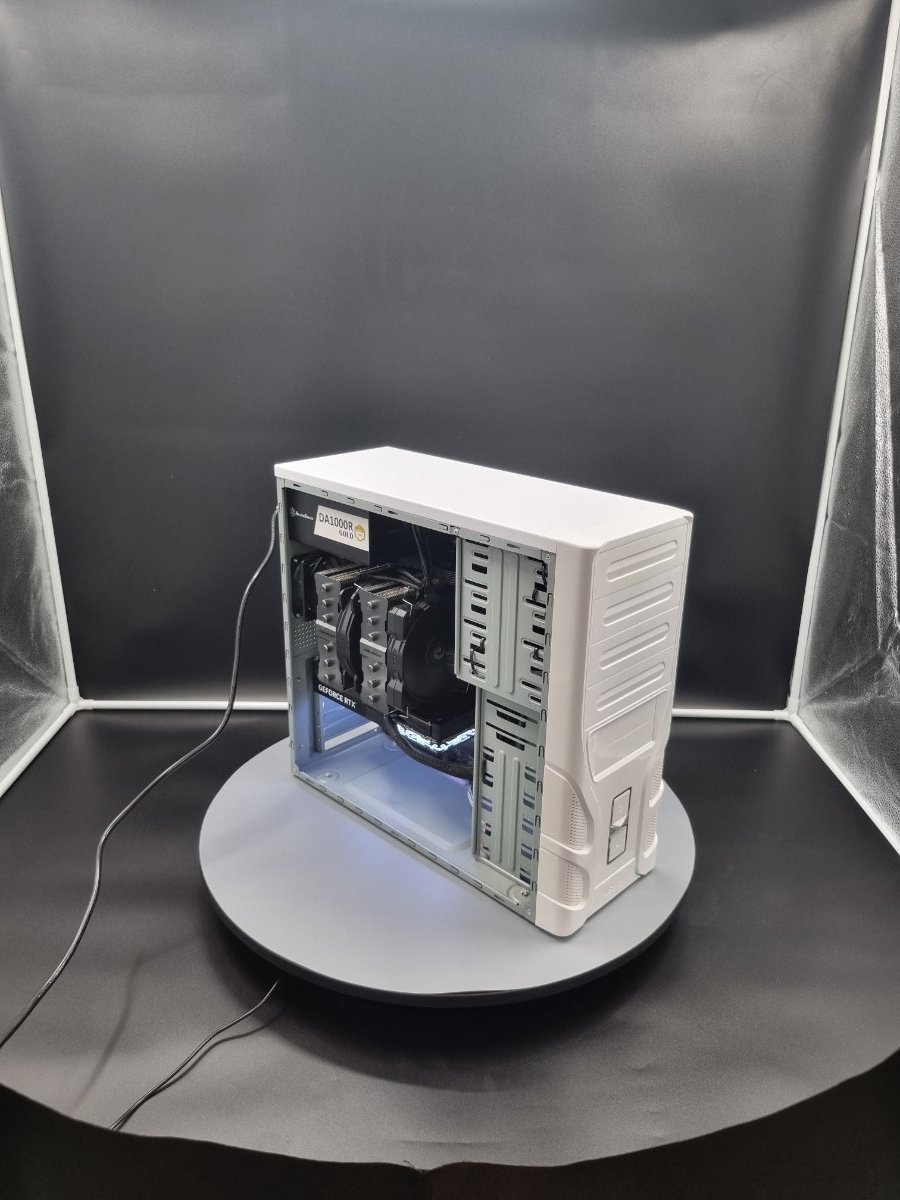
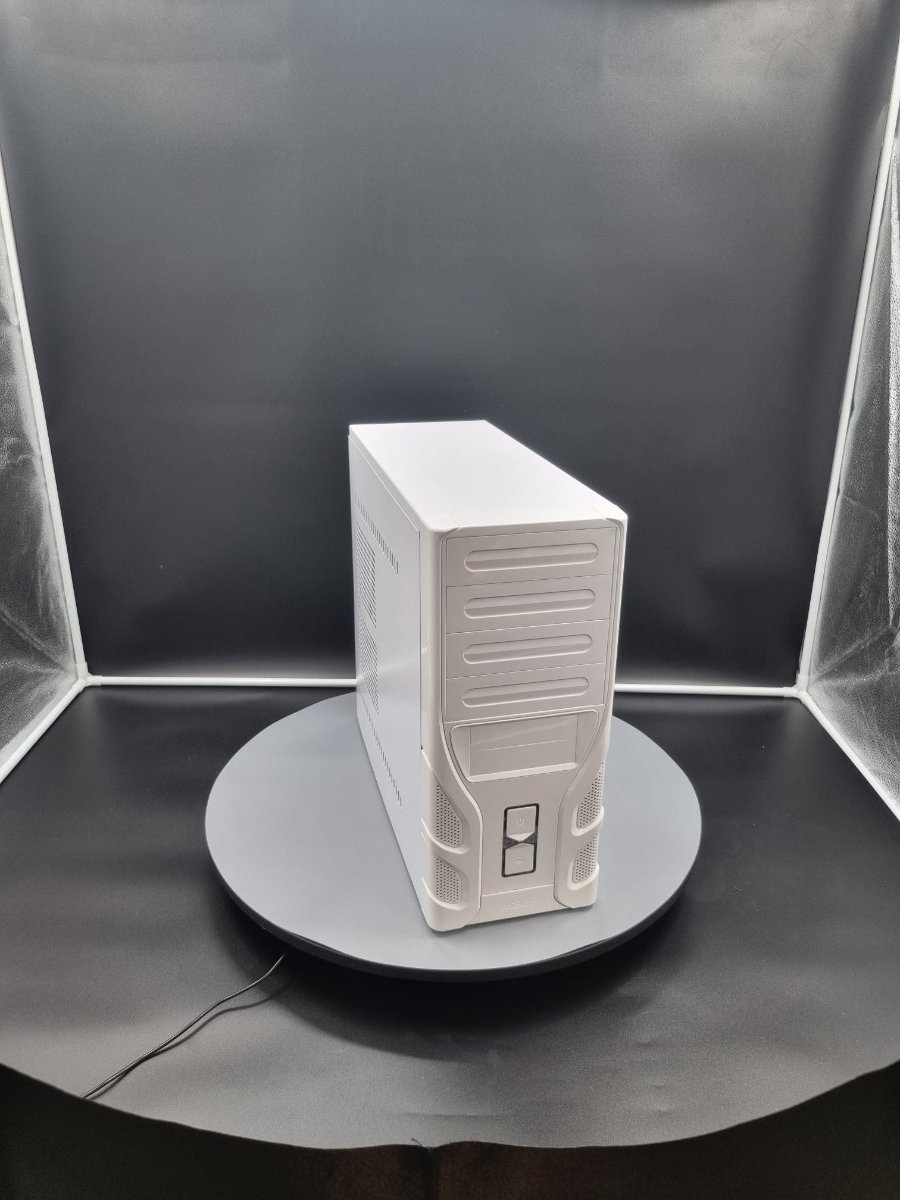
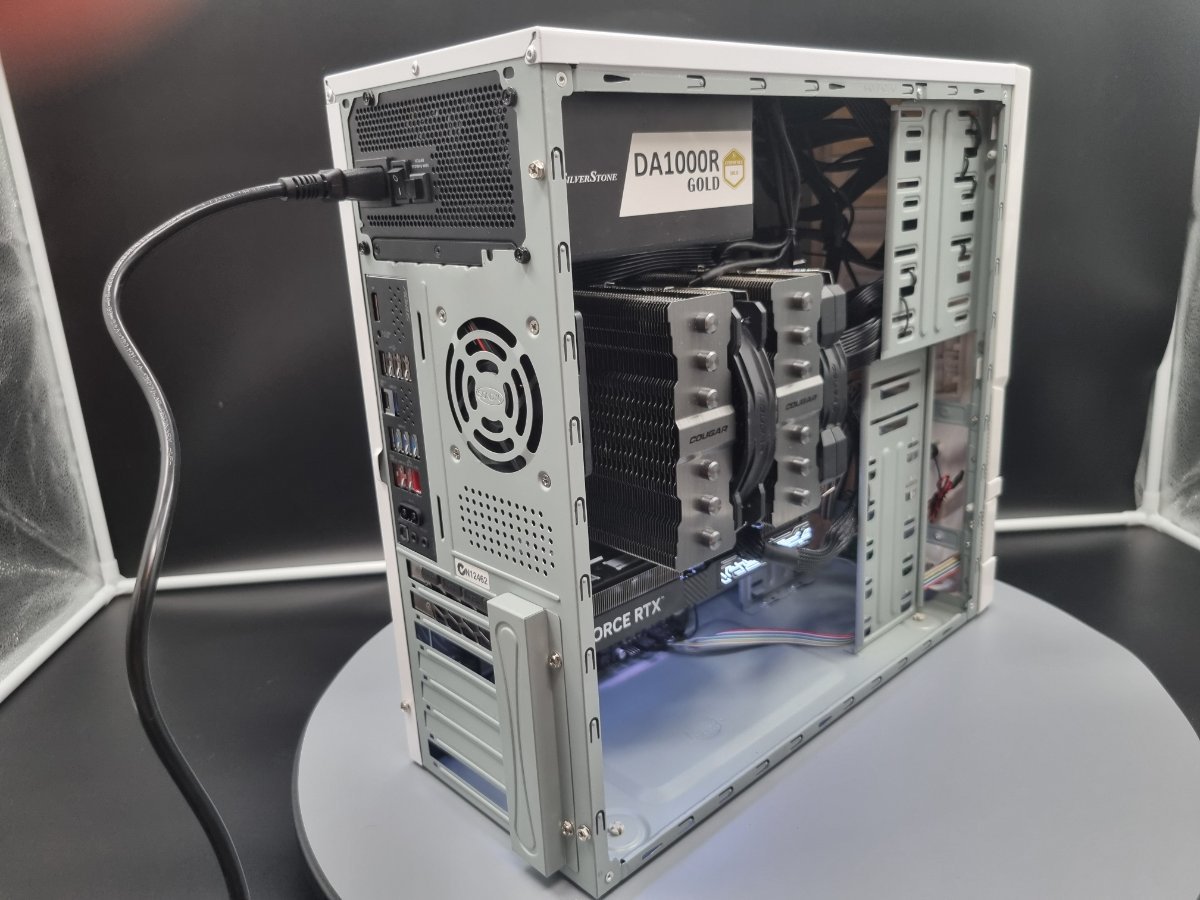
Alright guys, so first time posting in here, just want to state that the hibernator PC was a hoot to build, and here's a step by step guide to what I did to make this PC. I hope people enjoy the read as much as I enjoyed the write. Step 1 - I started by lining up where the motherboard standoffs go, due to it being an older case bought second hand, it didn’t include them, so I also had to grab some that I had sitting around. Step 2 – I grabbed the motherboard out and sat it on its box. Step 3 - I then grabbed out the CPU from the box, then I opened the CPU socket on the motherboard, by lifting up the socket lever. I then lined up arrow on the CPU socket and the arrow on the CPU itself, and I placed the CPU down, then I pulled the lever down which released the socket cover from its slot. Step 4 – Next we have the ram to install, which just meant open the box and pull the four sticks of 16gb ddr5 ram, made sure the notch lines up and then installed them one by one. Step 5 – I removed the m.2 cover from the motherboard using the clip on the motherboard, installed the 4tb m.2 into the primary slot, after that I removed the plastic from the thermal pads included on the m.2 cover and then put the cover back on Step 6 - Then I removed the plastic cooler brackets from the Motherboard and installed the brackets that were needed for the Forza 135 Dual Air Tower Cooler. Step 7 – After the cooler brackets are in place, I grabbed the case and had to remove an old cpu cooler air guide from the side panel. Step 8 – Now it’s time to install the motherboard into the case, and this motherboard has the I/O shield attached to the board, so no need to install that first. Then I screwed the motherboard down. Step 9 – Once the motherboard is in place, it was time to install the cooler, so we started by pasting the cpu with a x shape (my own preference), then I removed the plastic film from the heatsink and installed it onto the CPU socket. Step 10 – Then I grabbed out the power supply, and installed it with the four included screws. Step 11 – After that, I installed the two fans onto the tower cooler, with the 120mm fan on the outside, and the 140mm fan on the inside. Mounting them with the included clips to do so. Step 12 – Time to install the graphics card. So, I grabbed out the GPU from the box, installed it into the appropriate slot and screwed it down with the 2 necessary screws. (As mentioned earlier, this was a second hand case, so the PCI-E slot covers were already removed) Step 13 – I then installed the back case fan with the four necessary screws. Step 14 – Alright so at this point I then grabbed out my g-connector that was included with the motherboard, and installed my front I/O cables into the correct slots, then I plugged the g-connector into the correct spot on the motherboard Step 15 – At this point I have had to back track a bit, and pull out the tower cooler, as there was not enough room to fit my hand in to get the 8 pin motherboard connector into its slot. Once the tower cooler was removed I grabbed my 8-pin, 24-pin and my 12V2x6 / 12VHPWR (16-pin) cables from the power supply box. Connecting them to the power supply and then to the motherboard and graphics card. Step 16 – Now, I quickly grab a power cable and plug the computer in and test that it turns on with no errors. Once I know it turns on with no errors, I turn it off really quickly and reinsert the cooler onto the CPU. Step 17 – Now we are at the stage of cable managing, so I rerouted as many cable as possible into neat channels, and use tie downs to make it look as neat as possible.

-
How to Build a PC Step-by-Step (Beginner-Friendly Guide 2025)
Merzal#1414 posted a blog entry in Computers's Articles
How to Build a PC: Step-by-Step Guide for Beginners Building your own PC might seem daunting, but it’s absolutely achievable with the right guidance. This PC building guide will walk you through how to build a PC for beginners in a clear, step-by-step manner. We’ll cover everything from preparing your workspace to a final step-by-step PC assembly checklist. By following along, you can assemble a computer that meets your needs and gain a better understanding of how each component fits together. Table of Contents Preparation: Tools, Parts, and Safety Step 1: Install the CPU Step 2: Install the CPU Cooler (and Thermal Paste) Step 3: Install Memory (RAM) Step 4: Install M.2 SSD or Other Storage Step 5: Mount the Motherboard into the Case Step 6: Install the Power Supply (PSU) Step 7: Install the Graphics Card (GPU) Step 8: Connect Power Cables & Front Panel Step 9: Cable Management and Tidying Up Final Pre-Boot Checklist Preparation: Tools, Parts, and Safety Before diving into the build, take time to prepare your workspace, tools, and components: Choose a Suitable Workspace: Work on a large, clean, flat surface. Avoid building on carpet to minimize static electricity. Gather Your Components: You should have a motherboard, CPU (processor), CPU cooler, memory (RAM), storage drives (SSD/HDD), graphics card, power supply (PSU), and a PC case. Double-check compatibility: the CPU must match your motherboard’s socket, the RAM type (e.g., DDR4 or DDR5) must match the motherboard, and the PSU should have adequate wattage for your GPU/CPU. Have the Right Tools: The main tool you need is a Phillips #2 screwdriver for most screws. Optionally, have some zip ties for cable management, a pair of pliers or scissors to trim them, and a small flashlight or headlamp for tight spaces. An anti-static wrist strap can help prevent static damage (connect it to the PC case), or you can periodically ground yourself by touching the metal case. Safety Tip: Always unplug the power supply from the wall before working on your PC. Never work on components with the system powered. Also, be mindful of sharp edges inside cheap PC cases – handle components and case interior with care to avoid cuts. Compatibility Tip: Before assembly, verify that all parts are compatible. Ensure your motherboard fits your case (ATX, MicroATX, ITX, etc.), your PSU cables reach all components, and your graphics card can fit in the case (both length and width). With everything ready and checked, let’s start building! Step 1: Install the CPU Installing the CPU into the motherboard socket. Carefully take the motherboard out of its box and place it on your work surface (on top of the anti-static bag or foam it came with). Now get your CPU chip ready for installation: Locate the CPU Socket: On the motherboard, find the square CPU socket which likely has a protective cover. There’s a small metal lever or latch on one side. Gently press down and lift the lever to open the socket’s retention bracket. Remove any plastic cover, revealing the socket pins or contacts. Align the CPU: Notice a small gold triangle or arrow on one corner of your CPU. Find the matching triangle marker on the corner of the socket. Align these markers to orient the CPU correctly. This ensures the CPU’s pins (or pads) match the socket holes. Insert the CPU: Holding the CPU by its edges (avoid touching the gold pins or contacts on the underside), lower it straight down into the socket. It should drop in place with zero insertion force – do not push or force it. If it’s aligned properly, it will sit flat in the socket. Secure the CPU: Once the CPU is in place, lower the retention bracket back down. Press the lever back into place under its hook to lock the CPU. You may feel a bit of tension while locking it – that’s normal. If your socket had a cover, it will pop off as you close the lever (save it in your motherboard box in case you ever transport or RMA the board). Safety Tip: Be extremely careful not to bend any pins in the CPU socket or on the CPU. Bent pins can prevent the PC from working. If the CPU isn’t dropping in easily, double-check alignment rather than forcing it. Compatibility Tip: Make sure you have the correct CPU socket for your processor (for example, an Intel LGA1700 CPU won’t fit in an LGA1200 socket, and an AMD AM5 CPU won’t fit in an AM4 socket). Also, different sockets have different installation mechanisms (Intel uses LGA sockets with a lever, while many AMD CPUs have PGA pins and use a similar lever mechanism). With the CPU firmly seated, you’re ready to move on to cooling it. Step 2: Install the CPU Cooler and Thermal Paste Your processor generates heat, so installing the CPU cooler properly is critical. There are two main types of coolers: the stock air cooler (often included with mid-range CPUs) or an aftermarket cooler (air or liquid). The installation can vary, so always refer to the cooler’s manual, but general steps are below. CPU air cooler fan mounted on the motherboard, ready to cool the CPU. Apply Thermal Paste: Most air coolers sit on the CPU with a metal base. To help transfer heat, you need a thin layer of thermal paste on the CPU. If your cooler already has thermal paste pre-applied (a gray square on its underside), you can skip this. Otherwise, squeeze a small pea-sized dot of thermal paste onto the center of the CPU’s top surface. (This will spread out when the cooler is mounted.) Attach the CPU Cooler: Align the cooler over the four holes or mounting bracket around the CPU socket. Typically, stock Intel coolers have push-pins that go into the holes, while others use a bracket with screws. Gently place the cooler, and secure it per the manufacturer’s instructions: For push-pin coolers: Twist the pins to the unlocked position if required, then insert each pin into a hole and press down diagonally opposite pins (e.g., top-left, then bottom-right) until they click. Then do the other two. Verify all four are fully engaged. For screw-mounted coolers: Thread each screw a few turns, going in a cross pattern (tighten one corner a bit, then the opposite corner, etc.) to apply even pressure. Then tighten all the way, but do not overtighten – snug and firm is enough. Connect the Fan Cable: Locate the small wire coming from the cooler’s fan. Plug it into the CPU_FAN header on the motherboard (a 3- or 4-pin connector usually near the CPU socket). This powers the cooler’s fan. It should click into place; make sure it’s secure. Safety Tip: When applying thermal paste, less is more. A small dot is enough – too much paste can spill over and act as an insulator or cause a mess. If you ever need to redo it, clean off the old paste with isopropyl alcohol and a lint-free cloth before reapplying. Compatibility Tip: Ensure your cooler is compatible with your CPU socket. Many aftermarket coolers include different mounting brackets for Intel vs. AMD. Use the correct parts for your socket (e.g., AM4 bracket for AMD AM4 socket, LGA1700 standoffs for Intel 12th-gen, etc.). Now your CPU is installed and cooling in place – next up is memory. Step 3: Install Memory (RAM) Installing your RAM (Random Access Memory) is one of the simpler steps in PC assembly. RAM modules (DIMMs) are long sticks that click into the motherboard’s memory slots. Locate the RAM Slots: Find the long slots on the motherboard, usually near the CPU. Most modern boards have 2 or 4 memory slots. If the slots have two different colors (paired), that indicates the channels. Check your motherboard manual for the recommended slots to populate first (for dual-channel, usually slot 1 and 3, or 2 and 4). Open the Slot Latches: At either end of each RAM slot, there’s a small plastic latch/clip. Open these by pressing them outward (they may already be open on one side, depending on the board design). Align the RAM Stick: Notice the notch in the gold pins of the RAM module – it’s off-center. Align that notch with the bump in the motherboard slot. This ensures you orient the RAM correctly (it only fits one way). Insert the RAM: Place the module into the slot, making sure it’s lined up. Using your thumbs, press down firmly and evenly on both ends of the RAM stick. You’ll feel it snap in as the latches on the sides click up into the notch on the RAM. If the latches didn’t fully engage, press a bit more until they do. Repeat for additional RAM sticks. A PC builder installing components and connecting cables inside a PC case (note the already-installed RAM and CPU cooler). Troubleshooting Tip: If a RAM module isn’t fully clicking in, remove it and check for any obstructions. Ensure the notch is aligned and try again with steady pressure. It can require more force than you expect, but always press straight down – don’t wiggle or angle it. Compatibility Tip: Make sure you’re using compatible RAM. The motherboard will specify DDR4, DDR5, etc., and you must use that type. Also, mixing different RAM capacities or speeds can sometimes cause issues, so for best results use a matched kit (same size and speed). With memory installed, the core of the motherboard (CPU, cooler, RAM) is ready. If you have an M.2 SSD, install it before mounting the motherboard in the case, as it’s easier to do now. Step 4: Install M.2 SSD or Other Storage Most modern builds use an M.2 SSD (a gumstick-sized solid state drive) that mounts directly on the motherboard, and/or 2.5” SATA SSDs or 3.5” hard drives that mount in the case. We’ll handle M.2 now and other drives later once the motherboard is in the case. M.2 SSD (On Motherboard): Locate the M.2 slot on the motherboard (a small slot usually between the PCIe slots or near the SATA ports). If it has a heatsink cover, unscrew and remove that first. To install the M.2 drive: Remove the tiny screw at the end of the M.2 slot (don’t lose it!). Align the M.2 SSD’s connector with the slot and insert the drive at about a 30-degree angle. Push it in until fully seated. Gently press the drive down flat to the standoff on the motherboard. Secure it with the screw you removed. (Do not overtighten this tiny screw.) If your board has a heatsink for the M.2, remove any plastic film from its thermal pad and screw the heatsink back on over the drive. 2.5” or 3.5” Drives (SSD/HDD): If you have a SATA SSD or HDD, you will mount these inside the case, typically in dedicated drive bays or trays. At this stage, you can plan where they will go, but it’s often easier to mount them after the motherboard and PSU are in (so you can see cable lengths). We will cover drive mounting in a later step when connecting cables. Compatibility Tip: If using an NVMe M.2 SSD, ensure the M.2 slot supports NVMe PCIe drives (most do) and that installing an M.2 doesn’t disable any SATA ports (some motherboards share bandwidth between M.2 and SATA). Check your manual if unsure. Now that CPU, cooler, RAM, and possibly M.2 storage are on the motherboard, it’s time to put the motherboard into the case. Step 5: Mount the Motherboard into the Case Preparing the case and installing the motherboard is a crucial step. Take your time and handle the board by its edges. Prep the Case: Remove both side panels of your PC case (usually thumb screws or Philips screws at the back). Lay the case on its side so the open motherboard tray faces up. Make sure the motherboard standoffs (small brass spacers) are installed in the case’s motherboard tray in the holes that correspond to your board’s form factor (ATX, MicroATX, etc.). The standoffs keep the board raised and prevent short-circuits. Cases usually come with standoffs pre-installed or included separately. Install or rearrange them if needed so that each screw hole in the motherboard has a standoff underneath. Insert the I/O Shield: If your motherboard came with a separate I/O shield (the rectangular plate with cutouts for the rear ports), snap that into the rectangular hole at the back of the case. It should click in all four corners. Be careful of the metal tabs on the shield – make sure they aren’t bent in a way that will block the motherboard’s ports. Position the Motherboard: Hold the motherboard by the edges and gently lower it into the case. Align the board so that its ports fit through the I/O shield and the screw holes line up with the standoffs. It can help to tilt the board slightly to get the ports through the I/O shield first, then lay the board down on the standoffs. Screw in the Motherboard: Using the screws that came with your case (or motherboard), screw the motherboard down onto each standoff. Typically there are 6-9 screws. Start each screw lightly to make sure it’s not cross-threaded, then tighten them just until snug. Do not over-tighten (you can crack the board or strip the threads) – just secure enough that the board doesn’t move. Safety Tip: Double-check that there are no extra standoffs under the motherboard in the wrong place. An extra standoff touching the back of the board where it shouldn’t can short out and damage components. Only the holes that line up with the board should have standoffs. Troubleshooting Tip: If the screw holes don’t line up, verify you have the correct standoff positions for your board. You might need to slightly adjust the board’s position or the I/O shield alignment. Also ensure no cables are caught underneath the board. Now the motherboard is securely in the case. Next, we’ll install the power supply that will power all these components. Step 6: Install the Power Supply (PSU) The PSU (Power Supply Unit) typically goes in the bottom rear of modern cases (or top rear in some older designs). It provides power to all components, so proper installation and connecting the correct cables is important. Position the PSU: If your case has a bottom PSU mount, orient the PSU with its fan facing downward (if the case has a vent at the bottom) or upward (if no bottom vent or if on a carpeted floor). Slide the PSU into the case from the side or rear (depending on case design) until its screw holes at the back align with the case’s holes. Secure the PSU: Using the four screws that came with the PSU (or case), fasten the PSU to the case’s rear panel. These screws go in the four corners of the PSU from the outside back of the case. Tighten them snugly. Cable Planning: If your PSU is modular (cables detach), now is a good time to plug in the cables you’ll need: typically the 24-pin ATX cable (for motherboard), 8-pin EPS cable (for CPU power), PCIe power cables (for graphics card), SATA power cables (for drives), etc. If it’s a non-modular PSU, you’ll have a bundle of all cables already attached. Route the cables out of the way for now – you can push them through to the back side of the case if you have a cable management cutout. We will connect them in the next steps. Compatibility Tip: Ensure your PSU has enough wattage for your build. A quality 500W–750W unit covers most mid-range builds, but high-end systems with powerful GPUs might require 800W or more. It’s also important that the PSU has the necessary connectors (an 8-pin EPS for CPU, PCIe 8-pin plugs for your GPU, etc.). With the PSU in place, you have the “engine” ready to power the system. Now, let’s add the graphics card (if you have one) and then hook everything up. Step 7: Install the Graphics Card (GPU) If you’re using a dedicated graphics card, install it now while the case is still open and roomy. If you’re using integrated graphics and have no GPU card, you can skip this step. Prepare the Slot: Identify the top PCI Express x16 slot on your motherboard (that’s where the GPU goes, usually the reinforced longest slot). On the back of the case, you’ll need to remove 1 or 2 expansion slot covers corresponding to that slot (the metal strips blocking the case openings where the GPU’s ports will go). These are either unscrewed or snapped out. Remove the correct ones so the GPU’s output ports will be accessible from the back. Slot the GPU In: Hold the graphics card by its edges (and metal bracket). Align the gold PCIe fingers with the motherboard’s PCIe slot. Also make sure the card’s rear bracket lines up with the open slots at the back of the case. Push the card straight into the slot firmly until you hear/feel the click of the slot’s latch securing the card. The card’s gold fingers should be mostly or fully inside the slot. Secure the GPU: Use the screws (from the case) to screw the GPU’s bracket to the case on the expansion slot area. This usually involves 1 or 2 screws through the bracket into the case frame. Tighten them to hold the card in place. Connect PCIe Power (if required): Most modern GPUs need external power from the PSU. Locate the PCIe power connectors on the card (6-pin, 8-pin, or multiple). We will connect the appropriate PSU cable to these soon, but you can already route the correct PSU cable to the card’s vicinity. Safety Tip: Support the graphics card’s weight as you install it, especially big heavy cards. Make sure it is sitting level in the slot and not sagging significantly. All screws and latches should be secured to prevent the card from moving. Troubleshooting Tip: If the card doesn’t slot in, check if any obstruction in the case (drive bays, etc.) is hitting it, or if the slot covers removed were the wrong ones. Also ensure the slot’s latch at the end is open (some need to be pushed aside first) before inserting the card. Now your major components are all installed in the case. The final assembly steps are connecting all the power and data cables and then tidying up the wiring. Step 8: Connect Power Cables & Front Panel This step is all about wiring your PC. You will connect the power cables from the PSU to the motherboard and other components, as well as the front panel connectors (power button, USB ports, etc.) from the case to the motherboard. 1. Motherboard Power (24-pin ATX): Take the largest cable bundle from the PSU – the 24-pin connector – and plug it into the 24-pin socket on the motherboard (usually on the right-hand side). It only fits one way (a clip on the side of the plug will latch onto a notch on the socket). Press it in firmly until the latch clicks. This cable powers the motherboard. 2. CPU Power (EPS 8-pin): Plug in the 8-pin (or 4+4 pin) EPS connector from the PSU to the motherboard’s CPU power header, which is usually near the top-left of the board, by the CPU. Again, it has a clip that latches; ensure it’s fully seated. This powers the CPU. 3. GPU Power: If your graphics card requires power connectors (6-pin, 8-pin, or multiple), plug the corresponding PCIe power cable(s) from the PSU into the GPU. They usually clip in from the side or top of the card. Make sure each is firmly connected. (If the GPU has no external power connectors, it draws all power from the slot, so no PSU cable needed here.) 4. Storage Drive Cables: For 2.5”/3.5” SATA drives: Connect a SATA power cable from the PSU to each drive (the thin wide L-shaped connector). Then attach a SATA data cable from each drive to a SATA port on the motherboard (also an L-shaped connector, smaller than power). SATA data cables typically came with your motherboard. For the M.2 SSD: No cables needed, since it’s already in the slot. Make sure any drives are also physically secured in the case’s drive bays or trays (screw them in or latch them according to the case design if you haven’t already). 5. Case Front Panel Connectors: These are a bundle of small wires from the case’s front: usually labeled PWR SW (power switch), RESET SW (reset switch), PWR LED (power LED), HDD LED (drive activity LED), etc. Refer to your motherboard’s manual for the front panel header pin layout (often called “F_PANEL”). Plug each wire’s small two-pin connector onto the correct pins. This part can be fiddly – use tweezers or good lighting if needed. The labels on the connectors correspond to labels on the motherboard’s front panel block. (Tip: The writing on each connector typically faces upward or toward the outside of the pins.) 6. Case USB/Audio Connectors: If your case has front USB ports or audio jacks, connect those as well: USB 3.0 connector: A thick cable with a 19-pin block – plugs into a matching large header on the motherboard (often blue plastic inside). Align it carefully (it only fits one way due to a missing pin). USB 2.0 connectors: One or more small 9-pin plugs (often labeled like “USB1”) that go into 9-pin headers on the board. These also have a keyed pin – align and push in. Front Audio (HD Audio): A cable labeled HD_AUDIO (or AC’97) which plugs into the motherboard audio header (usually bottom left area of the board). Align the missing pin and press it in. Compatibility Tip: Sometimes cables can reach their destination only via certain routes in the case. Use the cutouts in the case (cable management holes) to run cables behind the motherboard tray and out where they need to plug in. This keeps the build cleaner and ensures cables aren’t stretched too tight. For example, front panel connectors often route through a bottom cutout to reach the header, and EPS CPU power cable might route behind the board to the top. At this point, every component should be installed and connected. Next, we’ll tidy up the cables for better airflow and aesthetics. Step 9: Cable Management and Tidying Up A tidy build is not just about looks – it also helps airflow and future maintenance. Cable management involves routing and securing excess cables so they don’t obstruct fans or interfere with components. Gather Excess Cable Length: Behind the motherboard tray (the right side of the case if looking from front) is the usual spot to tuck away extra cable length. Gently pull the slack of each cable to the back. For example, extra PSU cable length and SATA cable slack can reside here. Use Zip Ties or Velcro Straps: Most cases provide tie-down points (little loops or slots) on the back tray. Bundle related cables together and use zip ties or reusable Velcro straps to secure them to these points. For instance, tie the 24-pin and EPS cables together neatly, and bunch SATA power leads together. Trim off excess from zip ties. Keep Cables Clear of Fans: Make sure no cables are dangling into any fan blades (CPU cooler fan, case fans, GPU fans). Use additional ties to anchor cables away from any spinning fans. Front Side Neatness: On the main component side, try to route cables along edges and corners. For example, route the GPU power cable along the case’s side or behind the card, rather than across the middle. Tuck the front panel wires down low and behind things so they aren’t hanging loose. Install Side Panels: Once everything is tied down, gently put the back side panel on—ensure no bulging cables are in the way. It might take a bit of pressure if there are many cables, but if you have major difficulty, recheck and flatten any stubborn cable bundles. Then put the main clear/acrylic side panel back on to close up the case. Your PC build is now assembled! Before we hit the power button, let’s run through a final checklist to verify everything. Final Pre-Boot Checklist Before powering on your new PC for the first time, go through this checklist to ensure nothing was missed: All Components Installed: CPU (with cooler) ✔️, RAM ✔️, Motherboard ✔️, PSU ✔️, GPU (if any) ✔️, Storage drives ✔️. All Screws Tightened: Motherboard screws, PSU screws, GPU bracket screw, and any drive mounting screws are secured. (Not overly tight, just snug.) Power Cables Connected: 24-pin ATX to motherboard, 8-pin CPU power to motherboard, PCIe power to GPU, SATA power to drives. Data Cables Connected: SATA data cables from drives to motherboard, front panel USB 3.0/2.0 cables, front audio cable, etc., all firmly attached. Front Panel Wires Connected: Power switch at minimum is connected (so you can turn the PC on), as well as reset switch, LEDs, etc., in the right pins. CPU Cooler Fan Connected: CPU fan (and any case fans) are plugged into the appropriate motherboard headers or fan controller. No Loose Objects: Tools, extra screws, or brackets are not accidentally left inside the case. Also, no loose cables near fans. External Connections Ready: Plug in your monitor cable to the GPU (or motherboard video out if no GPU), and connect keyboard and mouse. Attach the power cord to the PSU and plug it into the wall. (Ensure the PSU switch is off [O] when plugging in.) Everything looks good? Double-check that PSU is switched off, then turn on the PSU switch ([-]). Now moment of truth: press the PC’s power button. If all has been done correctly, your new PC should spring to life – fans spinning, lights on. 🎉 Bonus Tip: On first boot, if you see nothing on screen, don’t panic. Check that the monitor is on the right input and connected. If still nothing, turn off and recheck the above connections (especially the power cables and RAM/GPU seating). Common issues are a loose power connector or RAM not fully clicked in. Once you see the BIOS/UEFI screen, you have successfully built your PC! From here, you can insert your OS installation media (like a USB drive for Windows or Linux) and proceed to install your operating system. Congratulations on completing this step-by-step PC assembly for your custom build! Enjoy your new PC and the satisfaction of having built it yourself. -
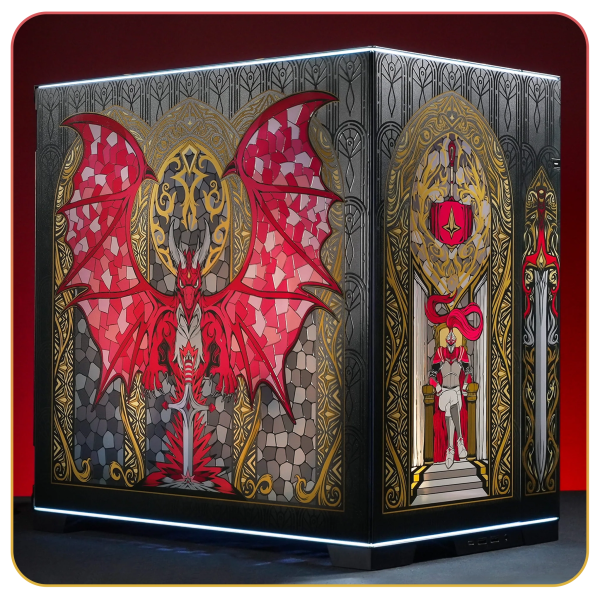
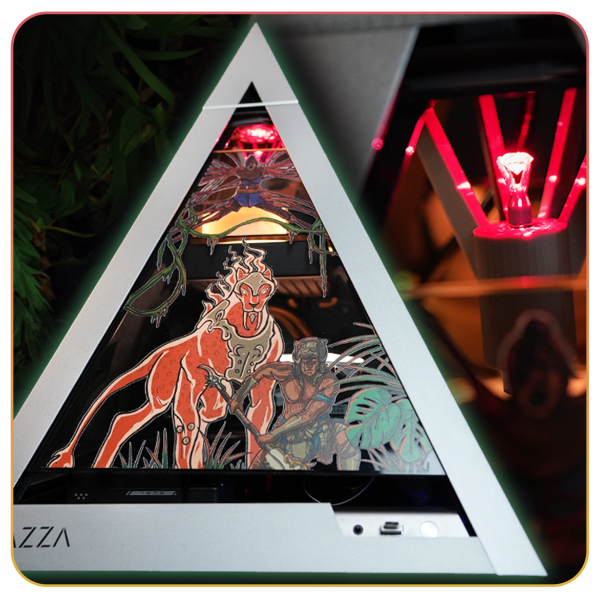
StarforgeDragonlight.png
Merzal#1414 posted a gallery image in Computers's Builds & Battlestation Showcase
-
-
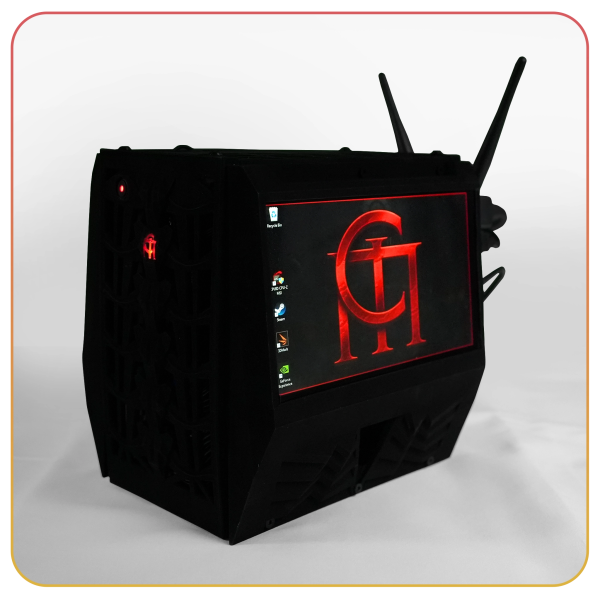
Reward_18_BBCG.png
Merzal#1414 posted a gallery image in Computers's Builds & Battlestation Showcase
-
-
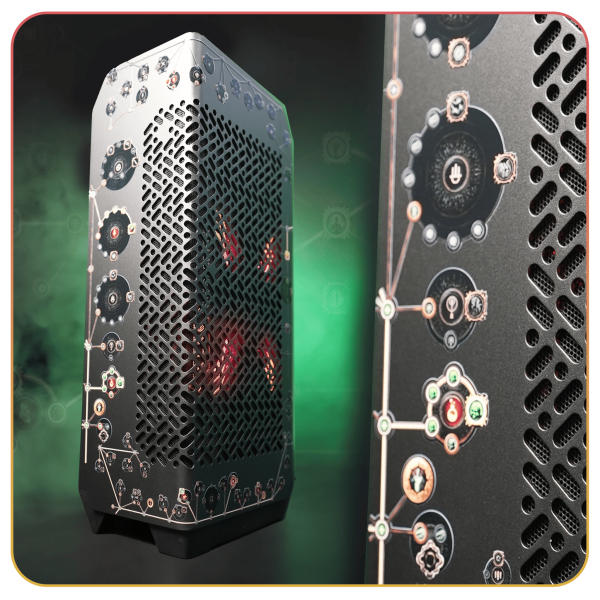
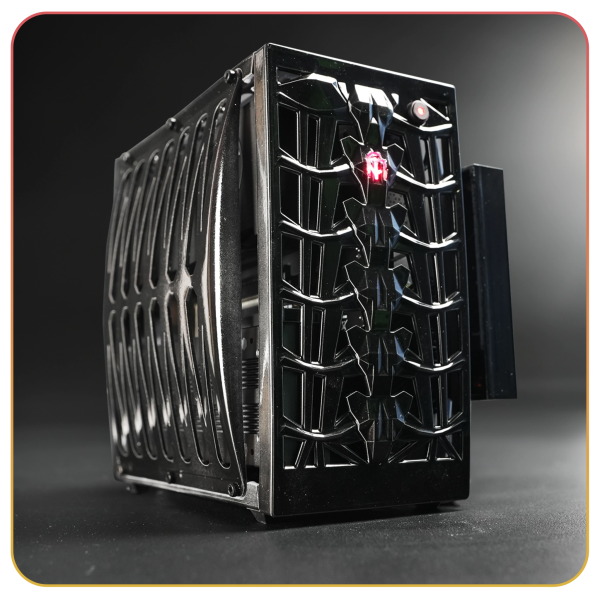
Reward_16_PoE2Clock.png
Merzal#1414 posted a gallery image in Computers's Builds & Battlestation Showcase

-
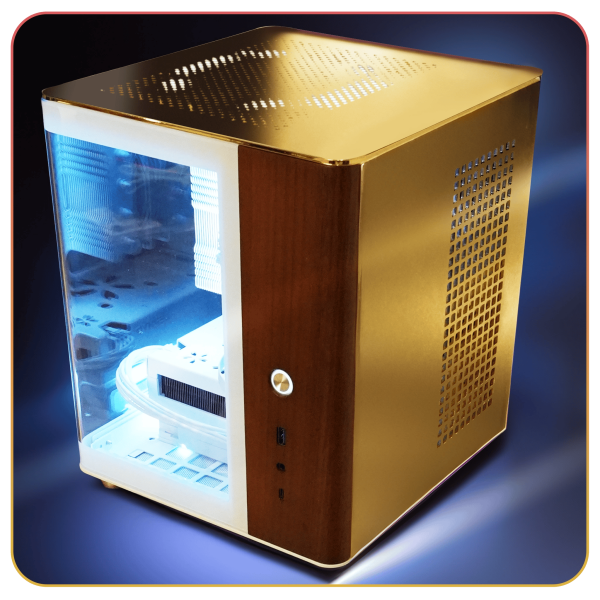
Reward_17_GoldGhost.png
Merzal#1414 posted a gallery image in Computers's Builds & Battlestation Showcase
-
-

-
-
-
-

-
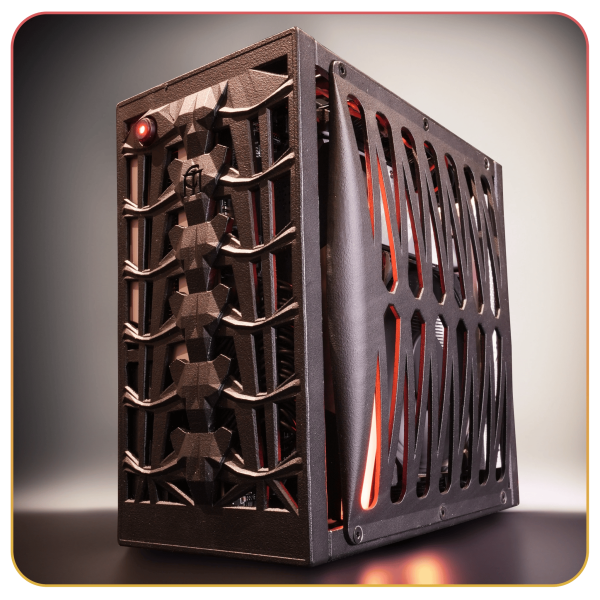
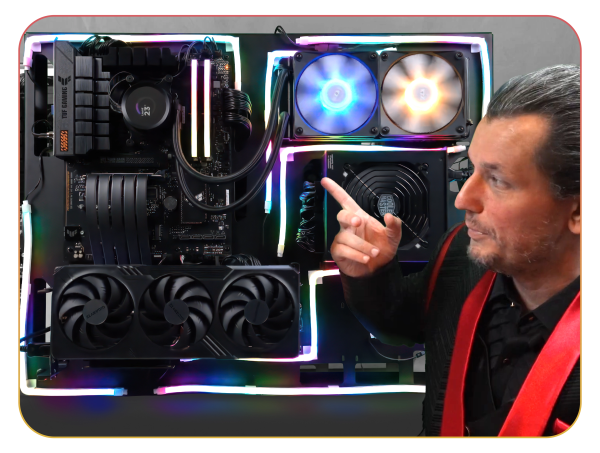
Reward_6_Turbine.png
Merzal#1414 posted a gallery image in Computers's Builds & Battlestation Showcase

-
Fallout 76 players have plenty to sink their teeth into this spring. Bethesda Game Studios rolled out significant Fallout 76 updates in March and April 2025, bringing new ways to play, fresh in-game events, and numerous gameplay improvements. From the long-awaited ability to play as a Ghoul to the debut of “Mini-Seasons” and a spring event teeming with monstrous flora, the latest Fallout 76 patch notes detail a host of changes that are both exciting and impactful. In this comprehensive roundup, we’ll break down the most relevant, interesting, and helpful news for Fallout 76 as of April 24, 2025 – including official patch notes highlights, seasonal events, gameplay tweaks, new content like weapons and armor, plus community highlights such as popular builds and player reactions. Ghoulification Arrives in Appalachia (Season 20: Glow of the Ghoul) One of the biggest recent additions is the Ghoul Within update, which launched on March 18, 2025 alongside Season 20: “Glow of the Ghoul.” This update allows Wastelanders to leave their humanity behind and play as a Ghoul – a first for the Fallout series. To begin, players undertake a new questline called “Leap of Faith” in a previously inaccessible area of the Savage Divide, where they undergo Ghoulification. Upon completing this irradiated rite of passage, your character is permanently transformed into a ghoul (though you can revert back to human at any time via the character menu if you change your mind). Becoming a ghoul isn’t just a cosmetic change – it fundamentally alters gameplay. Ghouls gain two unique innate abilities: “Feral” and “Glow.” The Feral mechanic introduces a new meter that replaces hunger/thirst; it depletes over time unless you consume Chems, and depending on how full it is, your ghoul gets different buffs or debuffs. Meanwhile, Glow means radiation now heals you and boosts your maximum HP instead of harming you – the more rads you soak up, the more you “glow” with extra health, which is tracked as a green strip on your HP bar. In short, playing as a ghoul makes radiation your friend and starvation a thing of the past, but comes with a trade-off: some human factions (notably the Brotherhood of Steel) will refuse to interact with ghoul players unless you’re disguised. Thankfully, the quest introduces an NPC ally who provides a ghoul disguise for those situations, allowing you to experience all story content even as an undead Appalachian. To support this new “lifestyle,” the Ghoul Within update added 30 ghoul-exclusive Perk Cards (28 standard perks and 2 legendary perks) that open up “ghoultastic” build possibilities. These perks, nicknamed “Gherks,” include abilities like Bone Shatterer (melee attacks have a high chance to cripple limbs) and Jaguar Speed (run faster when fully irradiated). Ghoul players can equip these new cards in addition to normal human perks, enabling powerful hybrid builds. With these changes, Fallout 76 builds centered around being a ghoul – for example, high-radiation melee brawlers or chem-fueled berserkers – have become a hot topic in the community. Season 20’s scoreboard, titled “Glow of the Ghoul,” ties into this theme as well. Running from March to June 2025, this season offers ghoul-themed rewards on the progression board – from glowing camp decor to gruesome outfits – as players earn S.C.O.R.E. to rank up. New Mini-Season & Spring Events Bloom in April The April 22, 2025 update introduced an entirely new concept to the game: Mini-Seasons, which replace the old limited-time challenge events system. The idea is to make these special events more visible and rewarding. A Mini-Season is essentially a small additional scoreboard that runs for a short period, sitting alongside the main Season in the menu. Instead of the old convoluted method of tracking event challenges, players can now easily find the latest Mini-Season on the Seasons menu and see its rewards track. Progression in Mini-Seasons is done via Season Tickets: completing event challenges earns tickets, which are then spent to unlock the Mini-Season rewards. The very first Mini-Season, “Appalachian Outlaws,” went live with the April update. This heist-themed mini-season runs from April 22 to May 6, 2025. As the name implies, its aesthetic is all about outlaws, crime and capers in the wasteland. Upon the mini-season’s start, players can claim a free “Money Bags Backpack” skin from the Seasons menu – this bag is your key to the event. Equipping the Money Bags Backpack enables the associated challenges, which involve things like stealing (looting) and cracking safes across Appalachia to earn Season Tickets. Those tickets in turn unlock rewards that fit the outlaw theme, such as a Wanted poster, a detective bulletin board, a fancy new outfit, and even a decorative piggy bank for your C.A.M.P. A new limited-time seasonal event is kicking off: “The Big Bloom.” This public event will run from April 29 to May 13, 2025, ushering in the spring with a deadly gardening twist. Players will meet a new quest-giver NPC named Black-Eyed Susan, an eccentric horticulturalist with a penchant for explosives. Susan’s favorite meadow has been overrun by mutant plant creatures called “Overgrown”. When the Big Bloom event is active, survivors will be tasked with venturing into this overgrown field to collect special flowers and eliminate waves of the plant-like beasts. After gathering enough flowers and thinning out the overgrowth, players trigger the wrath of Susan’s self-proclaimed arch-nemesis: Bee-Zlebub, the King Bee. Taking down Bee-Zlebub with your team will complete the event and grant you a bouquet of rewards. Patch Notes – Key Gameplay Changes and Fixes The April 22, 2025 patch (Update Version 1.7.19.19) delivered a hefty set of gameplay changes, balance tweaks, and bug fixes alongside the new content. Here are some of the most notable highlights: Limb Damage & Crippling Overhaul: Most enemies are no longer outright immune to having their limbs crippled, making it a more viable combat tactic. Weapon mods now boost limb damage by 50%, and several Perk Cards have been rebalanced to emphasize limb damage. Weapon Balance Updates: The classic Hunting Rifle’s base damage was increased from 100 to 140 at level 50. Several bugs and skin issues were also fixed. Armor and Power Armor Fixes: Power Armor no longer removes the ghoul disguise headwear. Several bugs affecting armor sets and mods were corrected. C.A.M.P. and Workshop Improvements: Items requiring rare consumables no longer return those items when scrapped. Dozens of placement and animation bugs were fixed. Enemy & Encounter Adjustments: Boss enemies like the Scorchbeast Queen will no longer spam abilities. Super Mutant XP is fixed, and various loot bugs were addressed. Quest and World Bug Fixes: Quests like “Leap of Faith” and “Wayward Souls” had progression bugs fixed. Several UI and interaction glitches were resolved. User Interface & Miscellaneous: Area-looting and map interaction quality-of-life updates, ultrawide display fixes, and improved perk behavior. Community Reactions and Popular Builds The Fallout 76 community has been buzzing about these updates. Players are already theory-crafting new “ghoul builds” that maximize the benefits of the Feral and Glow mechanics. Tanky melee ghoul builds that stay just below 100% Feral for constant buffs are popular, as are irradiated juggernauts who thrive in nuke zones. New ghoul perk cards offer abilities like damage boosts while irradiated or limb-crushing melee effects. Traditional builds are also seeing a resurgence. Sniper builds are now more viable thanks to the Hunting Rifle buff. Shotgun builds benefit from updated crippling perks. Heavy gunners gain more team utility through reliable limb crippling. Even old-school bloodied builds are getting creative hybrids with ghoul perks. On the community front, social media and forums are filled with screenshots of ghoulified characters, guides for Big Bloom, and teamwork strategies for Mini-Seasons. Players are sharing tips, coordinating runs, and enjoying the new layers of gameplay and progression. All told, Fallout 76 in April 2025 is thriving with new content and improvements. Whether you're embracing a new ghoul persona, grinding Mini-Seasons, or perfecting a powerful new build, Appalachia is full of life this spring.
- Earlier
-
.thumb.png.041942ccbc421517353baefb42e877b6.png)

Version 1.0.0
0 downloads
🧸 Cozy Pink Bear Bakery Twitch Sub Badges | Kawaii Aesthetic Stream Badges for Twitch, YouTube, Discord & TikTok ☕🥐 Add a touch of sweetness to your stream with these adorable Cozy Bear Bakery-themed badges! 🧸🥞 Whether you're a cozy gamer, a bakery lover, or just want to make your Twitch channel extra cute, these high-quality sub & bit badges are the perfect fit. 🧸 What's Included? ✨ 12 Hand-Drawn Pink Bear Bakery-Themed Badges in PNG format ✨ 8 Size Variations for seamless use across platforms (300px, 128px, 112px, 72px, 56px, 36px, 28px, 18px) ✨ High-Resolution, No Watermarks – Instant Download 🥐 Badge Designs in This Set: 🍯 Pancakes | 🍩 Donut | 🍞 Bread | 🍪 Macaron | 🍰 Cake | ☕ Coffee 🥧 Pie | 🍂 Cinnamon Roll | 🥐 Croissant | 🧁 Cupcake | 🍭 Cake Pop | 🧇 Waffle Each badge is carefully designed to bring warmth, coziness, and a delicious bakery aesthetic to your stream! 🌸✨ 🧸 Where Can You Use These? ✅ Twitch Sub Badges, Bit Badges, & Channel Points ✅ YouTube Membership Badges ✅ Discord Roles & Server Icons ✅ TikTok Badges Perfect for streamers looking to create a cozy, kawaii aesthetic for their community! 🎀 ⚡ Instant Download – No Waiting! This is a digital product – no physical item will be shipped. Once your purchase is complete, you’ll receive an instant download link. ⚠️ Important Information 🔸 No refunds on digital items, but I’m happy to assist with any issues! 🔸 These badges are for personal use only – resale, redistribution, or modification for sale is not allowed. 🔸 NFTs use are strictly prohibited. 🔸 Ownership & copyrights remain with Dreamstate Nikki. 💌 Have Questions? If you need any help or have any questions, feel free to message me. I’d love to help! 😊 ✨ Thank you for supporting my shop! Happy streaming! 🎀💖10.20 USD -
The season is about to end, but the PvP is about to begins Ultimate Diablo championship Bracket Link: https://battlefy.com/sato-nephalem/ultimate-diablo-championship/68084ce44190d60040554342/info We are hosting a 1v1 PvP tournament, where you nephalems can fight each other in the fields like roman's gladiators (is the donut's area) Is gonna be a best of 3 tournament, single elimination. Finals will be best of 5 and a bronze match. Prizepool: 1° 150usd 2° 50usd 3° 50usd In order to be eligible for the prize, The contestant must stream their screen through our website during combat, this will allow viewers to see the action in a consolidated view as well as provide judges with indisputable evidence. Console players will need to use twitch or discord or any other streaming or recording software to capture their screen during combat. Stream: https://www.twitch.tv/lilithmommy Rules: I'll keep it simple, into the common sense of no bug abuse, no snapshot or external softwares, but also i want to have a bit of balance, banning 1 particular skill that always dominate the fields, firewall. Macros, Scripts, 3rd Party Overlays, and any other hacks are banned under violation of ToS Selig ban Thorn ban Dodge Cap to 70% including aspect (outside town) Yen's Blessing ban Class specifics Firewall skill is ban No fire bird aspect, No flame shield enchant A player cannot have Deep Freeze and Flame shield on Skillbar Counterattack charges temper is not allowed We are planning to make more and better tournaments with the incoming next season!!!
-
Today’s tech enthusiasts are warily eyeing the next generation of graphics cards – NVIDIA’s 50 Series – and wondering how global trade tensions might affect their wallets. Graphics processing units (GPUs) are part of a complex international supply chain, and shifting tariff policies in key markets (the United States, European Union, United Kingdom, and China) could significantly impact NVIDIA 50 Series GPU pricing. In this article, we’ll explore how GPU tariffs in 2025 and beyond may increase costs to consumers, present speculative pricing scenarios under various tariff conditions, and examine the impact of trade policy on tech prices with insights from industry experts. Tariffs and Tech Prices: A Global Overview Tariffs are essentially taxes on imports, and they can have a direct impact on tech prices worldwide. When a country imposes tariffs on electronics or components, manufacturers and distributors often face higher costs to bring those products to market. Multiple studies and analyses have shown that these higher costs usually result in higher retail prices for consumers. In other words, tariffs on GPUs act as a surcharge that someone has to pay – and it’s often the end user. During the recent U.S.–China trade disputes, both countries introduced import levies that raised costs for manufacturers and consumers alike. Such price pressures were felt globally as supply chains adjusted and companies rerouted production to mitigate tariff impacts. By 2025, the international trade environment remains tense: the U.S. and China continue to spar over trade terms, and other regions are watching closely. Crucially, many countries (including the U.S., China, and EU members) are signatories to agreements that traditionally kept tariffs on technology products low or zero. However, trade policy exceptions and conflicts – like the ongoing trade war and new protectionist measures – have introduced special tariffs on items that include GPU components and finished graphics cards. United States: Trade Policy and GPU Pricing The United States is a major battleground for tech trade policy. In recent years, U.S. tariffs on Chinese-made goods have directly affected electronics. Graphics cards often have GPUs fabricated in Taiwan and assembly in China – a recipe for getting caught in the crossfire of U.S. import duties. As of 2025, the U.S. imposes significant tariffs on electronics imported from China. This policy means any NVIDIA 50 Series GPUs (or their components) coming from China face an extra 20% cost when entering the U.S. market. Retailers and board partners have signaled that tariffs will make GPUs more expensive. Major U.S. retailers have stated that vendors would pass along tariff costs to retailers, who in turn must raise prices. PC hardware manufacturers have admitted that new U.S. tariffs forced them to rethink their manufacturing, and in the interim, may absorb some of the cost and increase prices. American consumers have thus far been somewhat shielded by temporary tariff exemptions on PC components, but those exemptions are not guaranteed to last. If tariff exemptions lapse, GPU prices could spike significantly. On the positive side, the threat of tariffs has prompted NVIDIA and its partners to adapt their supply chain. NVIDIA is partnering with firms like TSMC and Foxconn to localize more production in the United States. While these efforts are focused on AI and data center hardware, they reflect a broader trend that could spill over to consumer GPUs. European Union: Tariffs and NVIDIA GPU Costs The European Union (EU) is another major market for NVIDIA, but its trade dynamics differ from the U.S. In general, the EU has not imposed the same kind of special tariffs on tech imports from China or Taiwan. European trade policy toward electronics has leaned more toward free trade, and the EU is part of agreements that eliminate tariffs on many technology products. Thus, an NVIDIA 50 Series GPU imported into an EU country likely wouldn’t face a hefty customs tariff at the border under normal conditions. However, the EU applies VAT of around 20% (varying by country) on electronics sales. That VAT, combined with currency exchange rates and logistics costs, often makes European retail prices for GPUs as high or higher than U.S. prices even without a tariff. The key point is that EU buyers might avoid the additional surcharges that tariffs can create. While European gamers still suffered from the global GPU shortage and crypto-driven price spikes over the past few years, they were at least spared the direct impact of U.S.-China trade tariffs. United Kingdom: Post-Brexit Tariff Landscape for GPUs The United Kingdom in 2025 largely mirrors the EU on tech import costs, despite Brexit. When the UK left the EU, it established its own tariff schedule, but it kept zero or low tariffs on most technology products. Like the EU, the UK does not currently levy any special tariff on graphics cards or GPUs coming from China or Taiwan. Thus, NVIDIA 50 Series GPUs sold in the UK shouldn’t incur an import tariff beyond any standard duties. UK buyers do pay a 20% VAT on PC hardware, and the UK’s smaller market size can sometimes mean slightly higher retail markups or less supply than mainland Europe. However, unless the UK government decides to align with a more aggressive U.S. stance or respond to some future dispute, it’s unlikely to impose tariffs on GPUs. China: Import Duties and the Domestic GPU Market China is both a critical part of the GPU supply chain and a huge consumer market for graphics cards. NVIDIA’s products are very popular among Chinese gamers and creators. Many NVIDIA GPUs are manufactured or assembled in China. For those units, when they are sold within China, there isn’t an import tariff because they’re made domestically. If a particular model is imported, Chinese customs could levy a tariff. That would bump up the cost for that item significantly. In practice, Chinese distributors have ways to minimize these costs, such as importing via Hong Kong or other routes. Another aspect is that the U.S. has imposed export controls on certain advanced GPUs to China. While this is separate from tariffs, it influences China’s view on tech supply. Such moves could indirectly raise production costs for GPUs globally, and that in turn raises prices for consumers in all markets. Tariff Scenarios: GPU Price Speculation for 2025 To visualize how tariffs might increase costs for NVIDIA’s 50 Series GPUs, here are speculative pricing models for different markets: United States: A $500 GPU could increase to $675+ with a 25% import tariff and sales tax. European Union: Without a tariff, a $500 GPU becomes $600 after ~20% VAT. United Kingdom: Similar to EU; $500 + 20% VAT = $600. Tariffs are not currently applicable. China: If locally assembled, $500 + 13% VAT = $565. If imported, a 20% tariff plus VAT could push it to $678. Extreme Case (U.S.): A 100% tariff would double the cost, turning a $500 GPU into a $1100+ product. These models show that tariffs could add 10% to 30%+ to the end price of a GPU depending on the rate and how costs compound through the supply chain, tariffs are of course higher or lower depending on the product and parts required to build the product, this article is to understand the numbers regardless of the tariff imposed since the tariff can rapidly change before and after this article. Expert Insights and Industry Reactions Industry professionals and market analysts have noted that tariffs are generally seen as a force driving up consumer prices. Retail leaders expect vendors to pass along tariff costs. PC component makers have planned price increases in response to tariff announcements. NVIDIA management has acknowledged that there is not much they can do about tariffs apart from working with partners to keep prices reasonable. The company is also reallocating manufacturing and lobbying behind the scenes. Global trade experts remind us that companies often reroute supply chains to countries without tariffs to minimize costs. Conclusion: Navigating an Uncertain GPU Pricing Future The world of GPU price speculation in 2025 inevitably has to factor in international trade policies. As explored, shifting tariff policies are poised to play a major role in NVIDIA 50 Series GPU pricing globally. The United States faces steep potential increases, the EU and UK might remain relatively insulated, and China balances domestic advantages against import duties. For consumers, the price tag might reflect more than just technological advancements; it could reflect geopolitical currents. The impact of trade policy on tech prices is now front and center. Tariffs, trade wars, and supply chain shifts are directly affecting the affordability of GPU upgrades. Understanding the economic and manufacturing forces behind GPU pricing helps consumers make informed decisions. International tariffs are a significant piece of the puzzle in 2025. Whether you're in New York, London, or Shanghai, being aware of these dynamics will help you anticipate how the cost of NVIDIA's next-gen GPUs may change and why.
-
untilTheCrimsonMarket.com has sponsored some community bounties for Last Epoch Tombs of the Erased release on April 17, 2025. These bounties will be available for everyone who starts a character within the new season.
-

Version 1.0.0
0 downloads
Present Twitch Channel Points Icon – Gift Badge for Twitch, YouTube, Discord, TikTok – Kawaii Stream Reward Icon ✨ Hand-Drawn Present Channel Points Icon in PNG format ✨ 8 Size Variations for seamless use: 300px, 128px, 112px, 72px, 56px, 36px, 28px, 18px ✨ High-Resolution, Transparent Background ✨ No Watermarks – Instant Download 🌸 Where Can You Use These? ✅ Twitch Channel Points, Badges, Rewards Perfect for streamers who love soft colors, cozy branding, and gift or holiday themes! 🎁 ⚡ Instant Download – No Waiting! This is a digital product – no physical item will be shipped. Once your purchase is complete, you’ll receive an instant download link. ⚠️ Important Information 🔸 No refunds on digital items, but I’m happy to assist with any issues! 🔸 These badges are for personal use only – resale, redistribution, or modification for sale is not allowed. 🔸 NFTs use are strictly prohibited. 🔸 Ownership & copyrights remain with Dreamstate Nikki. 💌 Have Questions? If you need any help or have any questions, feel free to message me. I’d love to help! 😊2.50 USD -

Version 1.0.0
0 downloads
🐧 Kawaii Penguin Twitch Badges | Cute Sub Bit Badges for Twitch YouTube Discord TikTok 🎀 Perfect for cozy gamers, VTubers, and kawaii streamers, this adorable badge set will add a pastel and charming touch to your Twitch, YouTube, Discord, or TikTok channel. 🎀 What’s Included? ✨ 10 Hand-Drawn Penguin -Themed Badges in PNG format ✨ 8 Size Variations for seamless use (300px, 128px, 112px, 72px, 56px, 36px, 28px, 18px) ✨ High-Resolution, No Watermarks – Instant Download 🐧 Badge Colors in This Set: 🎀 Pink | 💙 Blue | 💜 Purple | 🟠 Orange| 🟥 Red 🟩 Green | 💛 Yellow | Aqua | ⬛ Grey | 🌈 Rainbow Each badge is designed to bring soft, cozy, and cute Easter vibes to your stream! 🎀✨ 🌸 Where Can You Use These? ✅ Twitch Sub Badges, Bit Badges, & Channel Points ✅ YouTube Membership Badges ✅ Discord Roles & Server Icons ✅ TikTok Badges Perfect for streamers who love pastel aesthetics, cozy gaming, kawaii-themed branding! 🐧🎀 ⚡ Instant Download – No Waiting! This is a digital product – no physical item will be shipped. Once your purchase is complete, you’ll receive an instant download link. ⚠️ Important Information 🔸 No refunds on digital items, but I’m happy to assist with any issues! 🔸 These badges are for personal use only – resale, redistribution, or modification for sale is not allowed. 🔸 NFTs use are strictly prohibited. 🔸 Ownership & copyrights remain with Dreamstate Nikki. 💌 Have Questions? If you need any help or have any questions, feel free to message me. I’d love to help! 😊 ✨ Thank you for supporting my shop! Happy streaming! 🐧💖8.00 USD